

Date de dernière modification de l’article :

Voici la présentation & la documentation de ma première réalisation professionnelle portant sur une solution d’envoi de mots de passes de manière sécurisée & chiffrée avec « Password Pusher ».
Password Pusher peut être installé dans le cloud ou sur un serveur physique
Dans ce tutoriel, nous allons nous atteler à une méthode d’installation sur serveur physique avec une version Docker de password pusher all-in-one qui possèdera des fichiers de configuration pour personnaliser notre service :
Quels sont les avantages d’utiliser Password Pusher avec Docker ? :
Isolation et Sécurité :
- Docker permet d’isoler Password Pusher dans un conteneur, ce qui limite les interactions avec le système hôte et réduit les risques de sécurité.
Portabilité :
- Les conteneurs Docker sont portables, ce qui facilite le déploiement de Password Pusher sur différents serveurs ou environnements sans dépendre des configurations spécifiques du système.
Gestion Simplifiée des Dépendances :
- Docker encapsule toutes les dépendances nécessaires à Password Pusher dans le conteneur, évitant ainsi les conflits avec d’autres applications sur le serveur.
Mises à Jour Faciles :
- Les mises à jour de Password Pusher peuvent être appliquées en déployant simplement une nouvelle version du conteneur, ce qui simplifie le processus de maintenance. ( Nous allons même voir une solution pour automatiser la mise à jour de notre instance Docker Password Pusher).
Section 1 : Installation de Docker :
Ouvrez un terminal et assurez-vous que votre liste de paquets est à jour.
sudo apt-get update && sudo apt-get upgrade -yInstallez les paquets nécessaires pour permettre l’utilisation du dépôt Docker via HTTPS.
sudo apt install apt-transport-https ca-certificates curl software-properties-commonTéléchargez et ajoutez la clé GPG officielle de Docker.
curl -fsSL https://download.docker.com/linux/debian/gpg | sudo gpg --dearmor -o /usr/share/keyrings/docker-archive-keyring.gpgAjoutez le dépôt Docker à votre liste de sources APT.
echo "deb [arch=$(dpkg --print-architecture) signed-by=/usr/share/keyrings/docker-archive-keyring.gpg] https://download.docker.com/linux/debian $(lsb_release -cs) stable" | sudo tee /etc/apt/sources.list.d/docker.list > /dev/null
Mettez à jour votre liste de paquets et installez Docker.
sudo apt update -y
sudo apt install docker-ce docker-ce-cli containerd.io -y
Une fois l’installation terminée, vérifiez que Docker fonctionne correctement en exécutant la commande suivante :
sudo docker --versionPour exécuter Docker sans utiliser sudo, ajoutez votre utilisateur au groupe Docker.
#Remplacez la variable "$USER" par le nom d'utilisateur auquel vous souhaitez attribuer les droits sudo pour le groupe Docker.
sudo usermod -aG docker $USER
Après avoir exécuté cette commande, déconnectez-vous et reconnectez-vous pour que les modifications prennent effet.
A. Installation & Configuration de Docker Compose :
Ensuite, il nous faudra installer Docker Compose qui est un outil qui vous permet de définir et d’exécuter des applications Docker multi-container.
La documentation officielle de Docker Compose propose une méthode d’installation qui utilise les répertoires de plugins CLI de Docker. Cette méthode est particulièrement utile pour intégrer Docker Compose comme un plugin pour la CLI Docker, ce qui permet de l’utiliser de manière plus intégrée avec Docker. Voici comment procéder :
Vous avez la possibilité d’installer Docker-Compose à l’échelle d’un utilisateur (souvent un utilisateur appelé « docker ») ou l’installer à l’échelle du système:
Pour ma part, je vais installer Docker Compose à l’échelle du système.
Avantages de l’installation à l’échelle du système :
- Accessibilité pour tous les utilisateurs :
- Lorsque Docker Compose est installé à l’échelle du système, tous les utilisateurs du système peuvent y accéder. Cela est particulièrement utile dans les environnements multi-utilisateurs où plusieurs personnes peuvent avoir besoin d’utiliser Docker Compose.
- Gestion centralisée :
- Les administrateurs système peuvent gérer et mettre à jour Docker Compose de manière centralisée. Cela garantit que tous les utilisateurs utilisent la même version et que les mises à jour de sécurité sont appliquées uniformément.
- Compatibilité avec les scripts système :
- Les scripts et les services système qui nécessitent Docker Compose peuvent se trouver dans un emplacement standardisé, ce qui facilite l’automatisation et la gestion des déploiements.
- Sécurité :
- Les administrateurs peuvent appliquer des politiques de sécurité uniformes pour Docker Compose, comme des restrictions d’accès ou des configurations spécifiques, ce qui peut être plus difficile à gérer au niveau utilisateur.
#Creez l'arborescence destinée à recevoir le binaire approprié de docker-compose à l'échelle de l'utilisateur
sudo mkdir -p ~/.docker/cli-plugins/

curl -SL https://github.com/docker/compose/releases/download/v2.33.0/docker-compose-linux-x86_64 -o ~/.docker/cli-plugins/docker-compose

#Assurez vous de rendre le binaire exécutable avec cette commande:

sudo chmod +x ~/.docker/cli-plugins/docker-compose


#Vérifiez que docker-compose c'est bien installé
docker compose version

-----------------------------------------------------------------------------------

#Creez l'arborescence destinée à recevoir le binaire approprié de docker-compose à l'échelle du système
sudo mkdir -p /usr/local/lib/docker/cli-plugins

curl -SL https://github.com/docker/compose/releases/download/v2.33.0/docker-compose-linux-x86_64 -o /usr/local/lib/docker/cli-plugins/docker-compose

#Vérifiez que docker-compose c'est bien installé
docker compose version

#Assurez vous de rendre le binaire exécutable avec cette commande:

sudo chmod +x /usr/local/lib/docker/cli-plugins/docker-compose
B- Ajouter un Sous-domaine dans votre Active Directory pour résoudre le nom de domaine que vous allez attribuer à votre Password Pusher :
Rendez vous sur votre Gestionnaire de serveur de votre Active Directory et cliquez dans le menu latéral sur DNS, puis faites clic droit sur votre serveur DNS actif, puis cliquez sur « Gestionnaire DNS ».
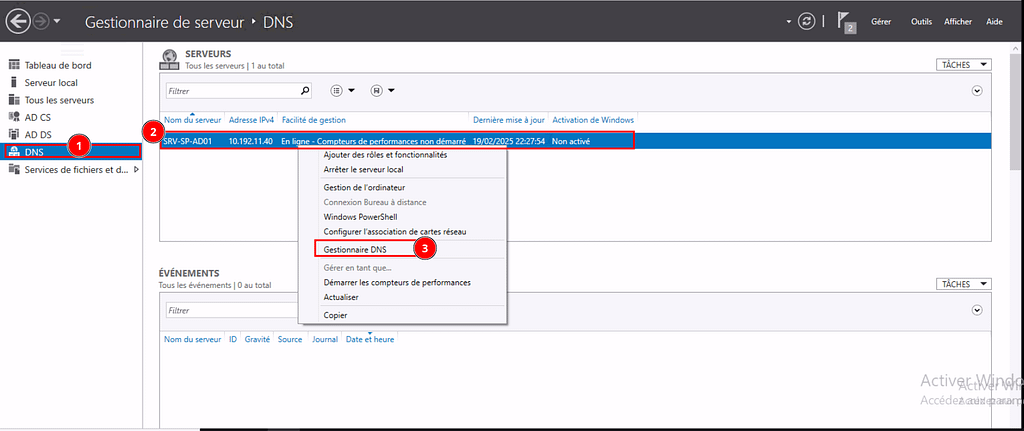
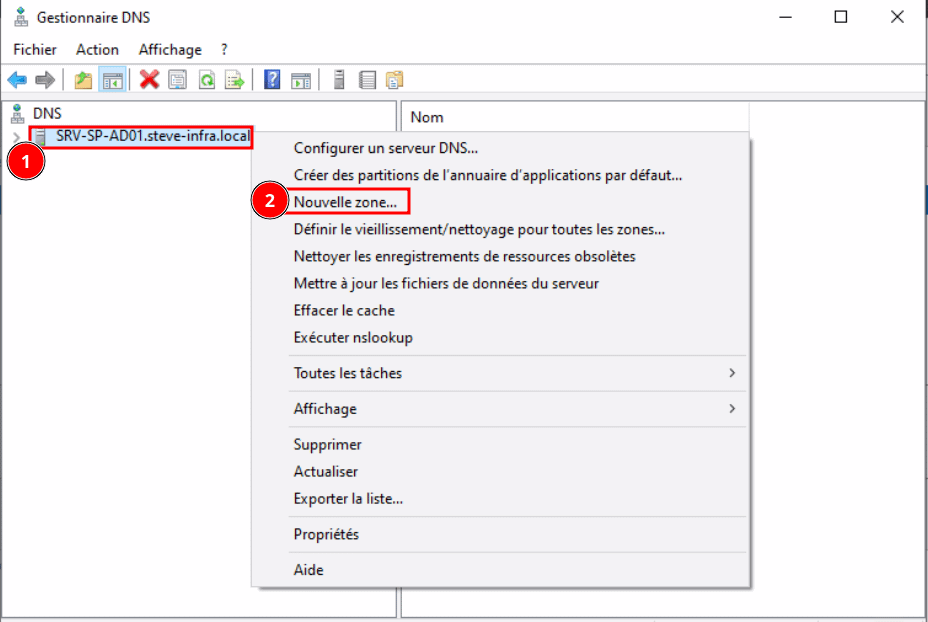
Dans le Gestionnaire DNS, développez votre serveur DNS et trouvez le domaine sous lequel vous souhaitez créer le sous-domaine. Faites un clic droit sur le domaine parent et sélectionnez « Nouvelle Zone ».
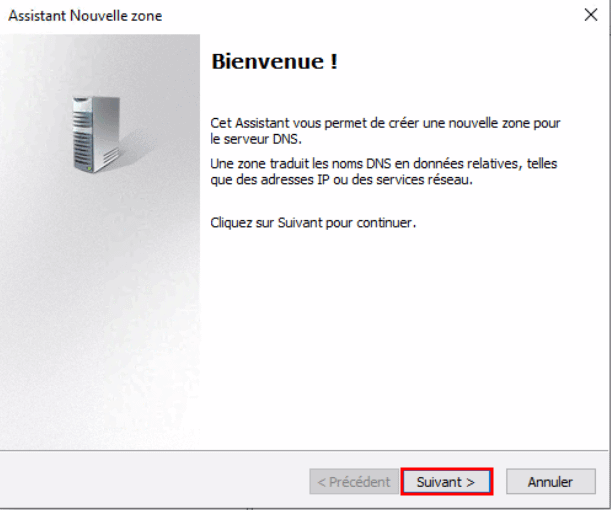
Vous allez ouvrir l’assistant de nouvelle zone et sur la première fenêtre, vous allez pouvoir faire « Suivant ».
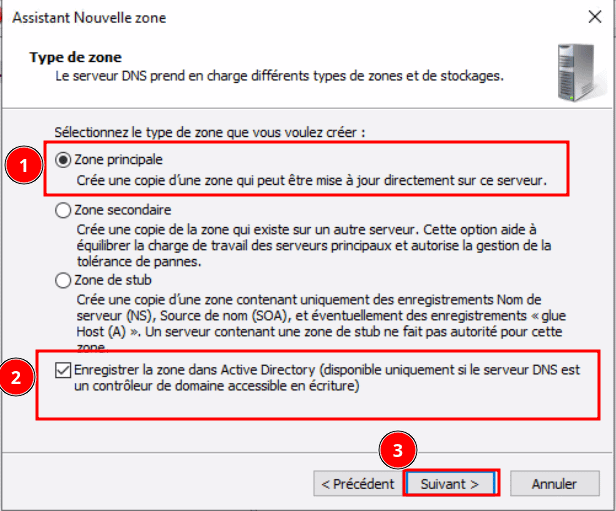
Suivez l’assistant pour créer une nouvelle zone. Vous serez invité à choisir entre une zone principale, secondaire ou stub. Pour un sous-domaine, choisissez « zone principale », puis vérifier que la case pour « Enregistrer la zone dans Active Directory » soit bien cochée et faites « Suivant ».
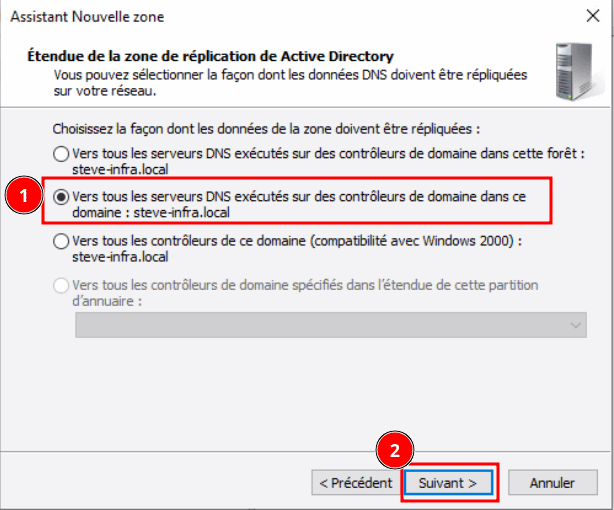
Ensuite, laissez l’option par défaut pour définir la zone de réplication de votre sous-domaine et faites « Suivant ».
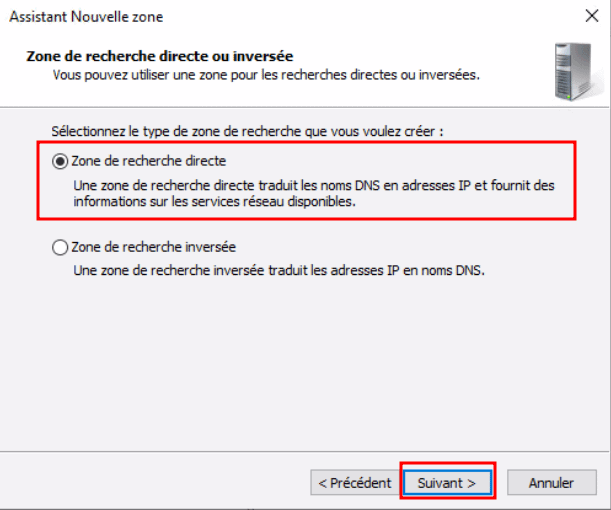
Après, il vous faudra choisir entre zone de recherche directe ou zone de recherche inversée, dans notre cas nous avons besoins que le nom de domaine de notre Password Pusher soit résolu en adresse ip par notre serveur DNS Active Directory.
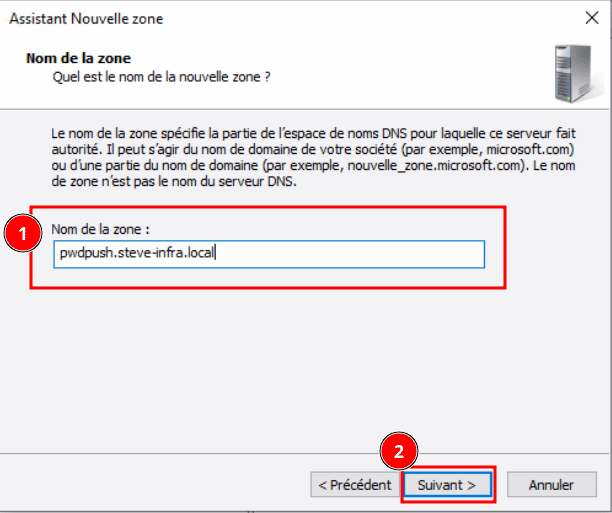
Il faudra définir un nom de zone qui sera la plupart du temps la concaténation de votre nom de domaine principal avec le préfixe de votre sous-domaine :
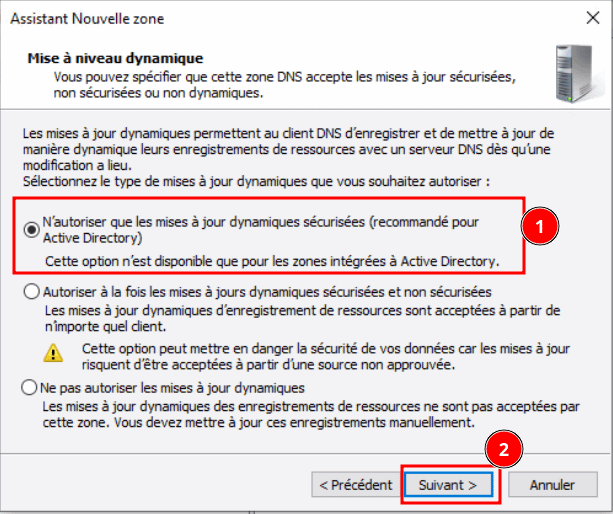
Vous pouvez laisser « mise à niveau dynamique sécurisées » et « Suivant ».
Vous arriverz à la fin de l’assistant de nouvelle zone avec un résumé des paramètres que vous allez appliquer et faites « Terminer ».

De nouveau dans le gestionnaire DNS, dépliez le contenu présent dans « Zones de recherche directes », cliquez une fois sur votre sous-domaine, puis clic droit
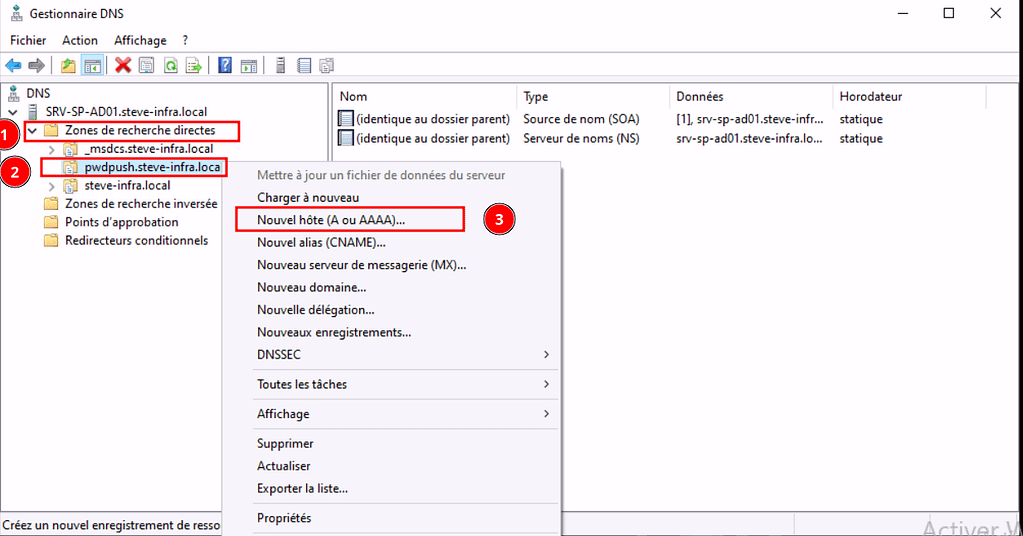
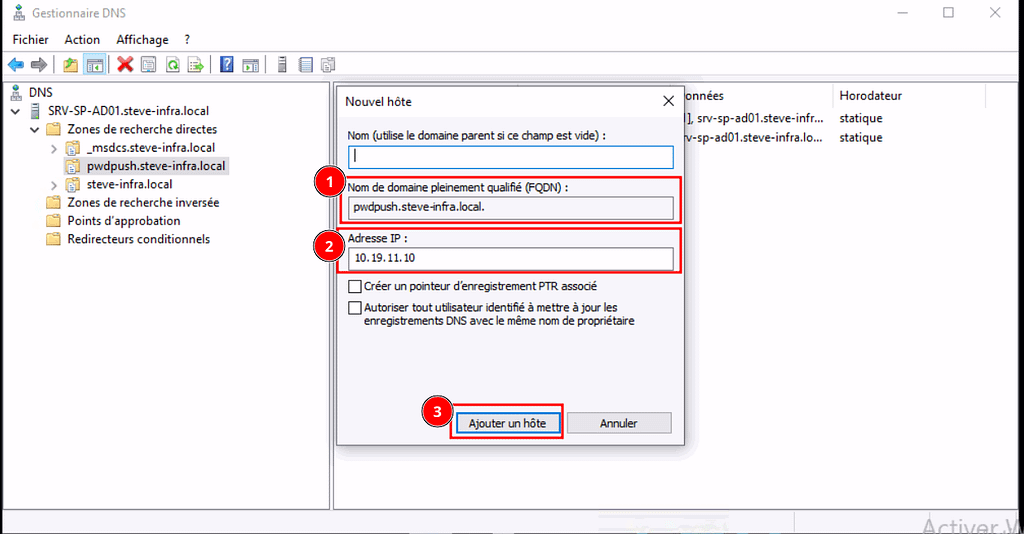
Dans la fenêtre « Nouvel hôte », laissez le premier champ vide, le second champ sera déjà pré-rempli et il ne vous restera plus qu’a mettre l’IP du serveur qui héberge votre Password Pusher, puis, cliquez sur « Ajouter un rôle ».
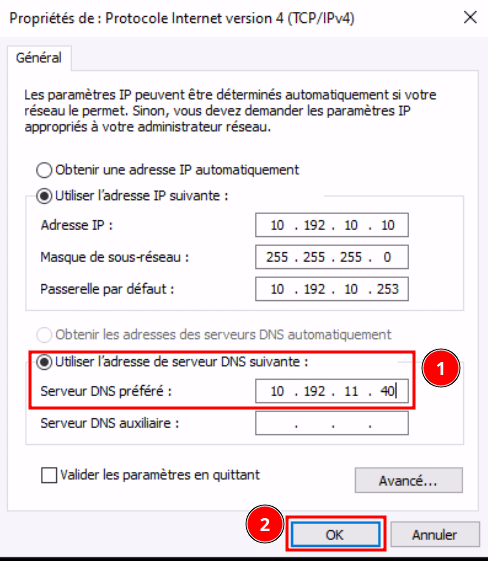
Pensez à modifier le « Serveur DNS Préféré » sur votre interface réseau par l’adresse IP de votre Active Directory sur votre PC client pour que le Serveur DNS puisse résoudre les requetes DNS de votre Client.
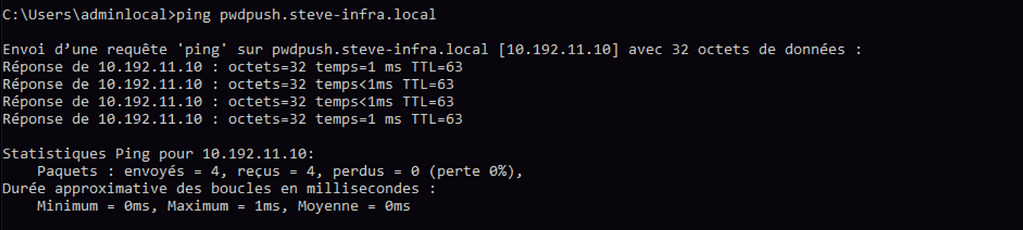
Testez la Résolution DNS : Utilisez les commandes ping ou nslookup pour vérifier que le nom de domaine se résout correctement sur votre PC client.
C- Installation et configuration du fichier de configuration « docker-compose-pwpush.yml » et « caddyfile » :
Remarque : Personnalisez les fichiers selon vos besoins. Les fichiers contiennent de la documentation expliquant comment configurer davantage Password Pusher pour répondre à vos besoins.
Pour commencer, nous allons télécharger les fichiers de configuration de nécéssaires « docker-compose-pwpush.yml » et « caddyfile ».
Nous allons créer un dossier à la racine de notre système et copier les configurations dedans pour les regrouper ensemble au même endroit :
sudo mkdir pwpush-all-in-one#Télécharge le fichier de configuration de "docker-compose-pwpush.yml"
sudo curl -o ~/Téléchargements https://docs.pwpush.com/assets/files/docker-compose-pwpush.yml
#Télécharge le fichier de configuration de "caddyfile"
wget -P ~/Téléchargements https://docs.pwpush.com/assets/files/Caddyfile
#Si comme moi, vous ne parvenez pas à les télécharger car les dépôts ne sont plus disponibles à partir des URLs de téléchargement officiel de Password Pusher, alors nous allons copier/coller les fichiers de configuration depuis les sources GitHub vers un fichier ouvert avec un editeur de texte.
#Allez dans votre navigateur et copiez les URL suivantes pour récupérer les configurations de "docker-compose-pwpush.yml" et "caddyfile".
sudo touch /pwpush-all-in-one/docker-compose-pwpush.yml
sudo touch /pwpush-all-in-one/Caddyfile
Pour docker-compose-pwpush.yml: https://github.com/pglombardo/PasswordPusher/blob/master/docker-compose-pwpush.yml -> copy raw file dans fichier /pwpush-all-in-one/docker-compose-pwpush.yml
Pour Caddyfile : https://github.com/pglombardo/PasswordPusher/blob/master/Caddyfile -> copy raw file dans fichier /pwpush-all-in-one/Caddyfile
Ouvrez le fichier de configuration « Caddyfile » et personnalisez-le en fonction de vos besoins :
sudo nano /pwpush-all-in-one/Caddyfile

{
  # Global options block
  email user@exemple.com  # Remplacez avec votre email pour recevoir les notifications Let's Encrypt
  acme_ca https://acme-v02.api.letsencrypt.org/directory  # Utilise l'API de production de Let's Encrypt
}

exemple.com { # Remplacez avec votre domaine
  reverse_proxy pwpush:5100

  ...<snip>...
}
Ouvrez le fichier de configuration « docker-compose-pwpush.yml »
sudo nano /pwpush-all-in-one/docker-compose-pwpush.yml

# une fois vos fichiers de configuration terminés, lancez vos instances avec Docker Compose

docker compose -f /pwpush-all-in-one/docker-compose-pwpush.yml up -d

# Tapez cette commande si vous désirez redémarrer toutes les instances de votre Password Pusher :

docker compose -f /pwpush-all-in-one/docker-compose-pwpush.yml restart
L’option -f : permet de spécifier l’emplacement de votre fichier de configuration de « docker-compose-pwpush.yml »
Cette sortie indique que tous les composants nécessaires pour votre configuration Password Pusher ont été téléchargés, configurés et démarrés correctement.
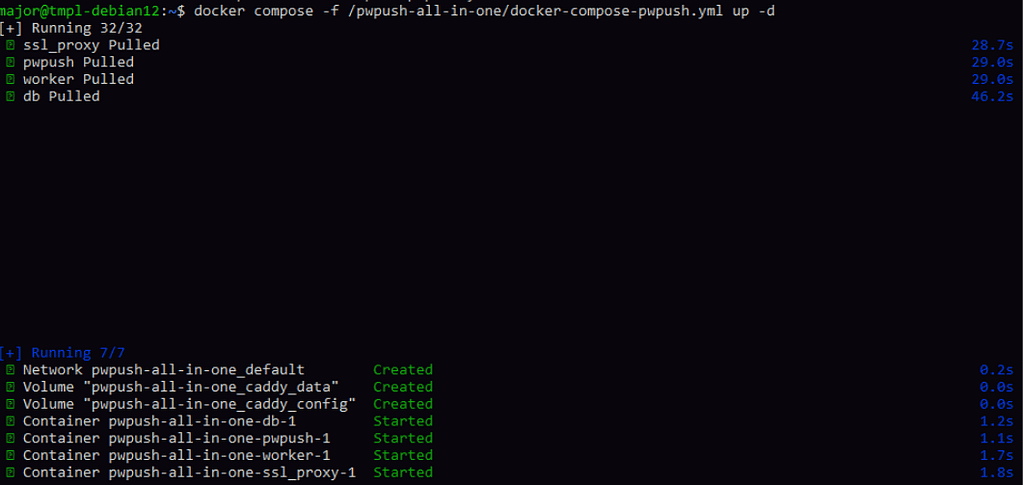
Vous devriez maintenant être en mesure d’accéder à votre application Password Pusher via https://nomdedomainedepasswdpusher.
Section 2 : Captures d’écran & code des fichiers de configuration de ma réalisation professionnelle personnalisée pour les besoin de ComptaCom :
Voici le code du fichier de configuration « docker-compose-yml » sans les informations trop confidentielles :
version: '2.1'

services:
  postgres:
    restart: "always"
    image: docker.io/postgres:15
    volumes:
      - /var/lib/postgresql/data:/var/lib/postgresql/data
    ports:
      - "5432:5432"
    environment:
      POSTGRES_USER: CONFIDENTIAL
      POSTGRES_PASSWORD: CONFIDENTIAL
      POSTGRES_DB: CONFIDENTIAL

  passwordpusher:
    image: docker.io/pglombardo/pwpush:release
    restart: "always"
    volumes:
      - type: bind
        source: /home/pwpusher/settings.yml
        target: /opt/PasswordPusher/config/settings.yml
      - /home/pwpusher/logos:/opt/PasswordPusher/public/logos:r
    environment:
      PWP__THEME: cyborg
      PWP_PRECOMPILE: true
      DATABASE_URL: 'postgres://CONFIDENTIAL:CONFIDENTIAL@postgres:5432/CONFIDENTIAL'
      PWP__BRAND__LIGHT_LOGO: /logos/logo.png
      PWP__BRAND__DARK_LOGO: /logos/logo.png
      PWP__BRAND__ICON_57x57: /logos/favicon.png
      PWP__BRAND__ICON_60x60: /logos/favicon.png
      PWP__BRAND__ICON_72x72: /logos/favicon.png
      PWP__BRAND__ICON_76x76: /logos/favicon.png
      PWP__BRAND__ICON_114x114: /logos/favicon.png
      PWP__BRAND__ICON_120x120: /logos/favicon.png
      PWP__BRAND__ICON_144x144: /logos/favicon.png
      PWP__BRAND__ICON_152x152: /logos/favicon.png
      PWP__BRAND__ICON_180x180: /logos/favicon.png
      PWP__BRAND__ICON_192x192: /logos/favicon.png
      PWP__BRAND__ICON_32x32: /logos/favicon.png
      PWP__BRAND__ICON_96x96: /logos/favicon.png
      PWP__BRAND__ICON_16x16: /logos/favicon.png
    ports:
      - "5100:5100"
    depends_on:
      - postgres
    links:
     - postgres:postgres
Voici le code du fichier de configuration « settings.yml » sans les informations trop confidentielles :
# Global Application Configuration
#
# This file uses YAML syntax.  Indentation must be 2 spaces (not tabs).
#
# See also https://github.com/pglombardo/PasswordPusher/blob/master/Configuration.md
# for a further explanation of the larger settings available here.

### Application Defaults
#

### URL Pushes
#
# Enable or disable URL based pushes.  These allow you to share URLs securely.
# Like regular pushes, they expire after a set time or amount of views.
#
# Note that `enable_logins` is required for URL based pushes to work.  It is a
# feature for logged in users only.
#
# Environment variable override:
# PWP__ENABLE_URL_PUSHES='false'
#
enable_url_pushes: false

### File Uploads
#
# File uploads are disabled by default since they require a place to store
# those files.
#
# If enabling file uploads, make sure to fill out the 'files' section below.
#
# Note that `enable_logins` is required for file uploads to work.  It is a
# feature for logged in users only.
#
# Environment variable override:
# PWP__ENABLE_FILE_PUSHES='false'
#
enable_file_pushes: false

### Logins (User accounts)
#
# Logins are disabled by default since they require an MTA (email) server
# available to send emails through.
#
# If enabling logins, make sure to fill out the 'mail' section below.
#
# For instructions on how to enable logins, see this page:
# https://github.com/pglombardo/PasswordPusher/discussions/276
#
# Environment variable override:
# PWP__ENABLE_LOGINS='false'
#
enable_logins: false

## Disable Signups
#
# Disallow new user accounts to be created in the application.
#
# Set this after you have your desired user accounts created.  It will
# not allow any further user account creation.
#
# Environment variable override:
# PWP__DISABLE_SIGNUPS='false'
#
disable_signups: false

## Limit Signups to Specific Email Domains
#
# By default, anyone can sign up for an account.  The following default regular
# expression just validates if it is a valid email address.
#
# signup_email_regexp: '\A[^@\s]+@[^@\s]+\z'
#
# If you would like to limit signups to specific email domains, you can extend
# the regular expression below to include the domains you want to allow.
#
# For example, to only allow signups from the domain 'hey.com', you would
# change the following to:
#
#   signup_email_regexp: '\A[^@\s]+@(hey\.com)\z'
#
# or for multiple domains:
#
#  signup_email_regexp: '\A[^@\s]+@(hey\.com|gmail\.com)\z'
#
# Tip: use https://rubular.com to test out your regular expressions. It includes
# a guide to what each component means in regexp.
#
# Environment variable override:
# PWP__SIGNUP_EMAIL_REGEXP='\A[^@\s]+@[^@\s]+\z'
#
signup_email_regexp: '\A[^@\s]+@[^@\s]+\z'

### Allow Anonymous
#
# By default, Password Pusher can be used by anonymous users to push
# new passwords and generate secret URLs.  If you want to limit functionality
# to logged in  users only, set the following value to true.
#
# This does not affect password secret URLs themselves as anonymous is always
# allowed there.
#
# Environment variable override:
# PWP__ALLOW_ANONYMOUS='true'
#
allow_anonymous: true

### Host Domain
#
# The domain (without protocol) where this instance is hosted
# Used in generating fully qualified URLs.
#
# Environment variable override:
# PWP__HOST_DOMAIN='pwpush.com'
#
# host_domain: 'pwpush.com'

### Host Protocol
#
# The protocol to reach the domain above
# Used in generating fully qualified URLs.
#
# Environment variable override:
# PWP__HOST_PROTOCOL='https'
#
host_protocol: 'https'

### Base URL Override
#
# Set the following value to force the base URL of generated links.
#
# Environment variable override:
# PWP__OVERRIDE_BASE_URL='https://pwpush.mydomain.com'
#
# You could even add a port if needed:
# PWP__OVERRIDE_BASE_URL='https://pwpush.mydomain.com:5100'
#
# Set this value without a trailing slash ('/').
#
# override_base_url: 'https://pwpush.mydomain.com'

### Show version on the footer
#
# Enable/disable PasswordPusher verison on the footer.
#
# Environment variable override:
# PWP__SHOW_VERSION=true
#
# Default: true
show_version: false

### Show the GDPR cookie consent banner
#
# Enable/disable the GDPR cookie consent banner.
#
# Environment variable override:
# PWP__SHOW_GDPR_CONSENT_BANNER=true
#
# Default: true
show_gdpr_consent_banner: false

### Timezone
#
# Set the timezone for the application.  A full list of timezone strings
# can be found here:
# https://en.wikipedia.org/wiki/List_of_tz_database_time_zones
#
# Environment variable override:
# PWP__TIMEZONE='America/New_York'
#
# Default: 'America/New_York'
timezone: 'Europe/Paris'

### Allowed Hosts
#
# This is a list of allowed hosts for the application.  This is used to
# prevent host header attacks.
#
# When set, the application will only respond to requests with a host header
# that matches one of the values in this list.
#
# This feature is generally only used when the application is behind a proxy.
#
# It's generally not required to use this unless you are getting the related error
# in the application.  localhost and the IP that the application is running on
# are always allowed.
#
# Note: If you need more than one value to the environment variable, separate
# entries by a single space.
#
# Environment variable override:
# PWP__ALLOWED_HOSTS='pwpush.com pwpush.mydomain.com pwpush.myotherdomain'
#
# allowed_hosts:
#   - 'pwpush.com'
#   - 'pwpush.mydomain.com'
#   - 'pwpush.myotherdomain.com'

## Expiration Settings for Password Pushes
#
pw:
  # Expire Password Pushes After XX Days
  #
  # Controls the "Expire After Days" for Password Pushes
  #
  # Environment variable overrides:
  # PWP__PW__EXPIRE_AFTER_DAYS_DEFAULT=7
  # PWP__PW__EXPIRE_AFTER_DAYS_MIN=1
  # PWP__PW__EXPIRE_AFTER_DAYS_MAX=90
  #
  expire_after_days_default: 7
  expire_after_days_min: 1
  expire_after_days_max: 30

  # Expire Password Pushes After XX Views
  #
  # Controls the "Expire After Views" form settings in Password#new
  #
  # Environment variable overrides:
  # PWP__PW__EXPIRE_AFTER_VIEWS_DEFAULT=5
  # PWP__PW__EXPIRE_AFTER_VIEWS_MIN=1
  # PWP__PW__EXPIRE_AFTER_VIEWS_MAX=100
  #
  expire_after_views_default: 5
  expire_after_views_min: 1
  expire_after_views_max: 10

  # Retrieval Step for Password Pushes
  #
  # This enables or disables the "1-click retrieval step" feature entirely.  For the default value
  # when it is enabled here, see the next setting.
  #
  # Environment variable override:
  # PWP__PW__ENABLE_RETRIEVAL_STEP='false'
  #
  enable_retrieval_step: false

  # Default Form Value for the Retrieval Step
  #
  # When the retrieval step is enabled (above), what is the default value on the form?
  #
  # When true, secret URLs will be generated as /p/xxxxxxxx/r which will show a page
  # requiring a click to view the page /p/xxxxxxxx
  #
  # Environment variable override:
  # PWP__PW__RETRIEVAL_STEP_DEFAULT='true'
  #
  retrieval_step_default: false

  # Deletable Password Pushes
  #
  # default: true
  #
  # This enables or disables the "Allow Immediate Deletion" feature entirely.  For the default value
  # when it is enabled here, see the next setting.
  #
  # Environment variable override:
  # PWP__PW__ENABLE_DELETABLE_PUSHES='false'
  #
  enable_deletable_pushes: false

  # Deletable Pushes Default Value
  #
  # default: true
  #
  # When this is set to true, this option does two things:
  #   1. Sets the default check state for the "Allow viewers to
  #       optionally delete password before expiration" checkbox
  #   2. JSON API: Sets the default value for newly pushed passwords if
  #       unspecified
  #
  # Environment variable override:
  # PWP__PW__DELETABLE_PUSHES_DEFAULT='false'
  #
  deletable_pushes_default: false

  # Blur Payloads
  #
  # default: true
  #
  # This option does not affect the JSON API - web UI only.
  # When this is set to true, this option will display the pushed text payload as
  # blurred out text.  This is useful for recipients in public places who don't
  # want to reveal the sensitive information until when they choose.
  #
  # The blur is disabled with a single mouse click.
  #
  # Setting this option to false will disable the blur feature entirely for password pushes.
  #
  # Note: This is a global on/off switch currently.  This may be made configurable per push
  # in the future by adding a new checkbox and a `blur_default` setting.
  #
  # Environment variable override:
  # PWP__PW__BLUR='false'
  #
  enable_blur: true

## Expiration Settings for URL Pushes
#
url:
  # Expire URL Pushes After XX Days
  #
  # Controls the "Expire After Days" for URL Pushes
  #
  # Environment variable overrides:
  # PWP__URL__EXPIRE_AFTER_DAYS_DEFAULT=7
  # PWP__URL__EXPIRE_AFTER_DAYS_MIN=1
  # PWP__URL__EXPIRE_AFTER_DAYS_MAX=90
  #
  expire_after_days_default: 7
  expire_after_days_min: 1
  expire_after_days_max: 90

  # Expire URL Pushes After XX Views
  #
  # Controls the "Expire After Views" form settings in Password#new
  #
  # Environment variable overrides:
  # PWP__URL__EXPIRE_AFTER_VIEWS_DEFAULT=5
  # PWP__URL__EXPIRE_AFTER_VIEWS_MIN=1
  # PWP__URL__EXPIRE_AFTER_VIEWS_MAX=100
  #
  expire_after_views_default: 5
  expire_after_views_min: 1
  expire_after_views_max: 100

  # Retrieval Step for URL Pushes
  #
  # This enables or disables the "1-click retrieval step" feature entirely.  For the default value
  # when it is enabled here, see the next setting.
  #
  # Environment variable override:
  # PWP__URL__ENABLE_RETRIEVAL_STEP='false'
  #
  enable_retrieval_step: true

  # Default Form Value for the Retrieval Step
  #
  # When the retrieval step is enabled (above), what is the default value on the form?
  #
  # When true, secret URLs will be generated as /r/xxxxxxxx/r which will show a page
  # requiring a click to view the page /r/xxxxxxxx
  #
  # Environment variable override:
  # PWP__URL__RETRIEVAL_STEP_DEFAULT='true'
  #
  retrieval_step_default: false

### File Upload: Expiration & Storage Settings
#
files:
  # Expire File Pushes After XX Days
  #
  # Controls the "Expire After Days" for File Pushes
  #
  # Environment variable overrides:
  # PWP__FILES__EXPIRE_AFTER_DAYS_DEFAULT=7
  # PWP__FILES__EXPIRE_AFTER_DAYS_MIN=1
  # PWP__FILES__EXPIRE_AFTER_DAYS_MAX=90
  #
  expire_after_days_default: 7
  expire_after_days_min: 1
  expire_after_days_max: 90

  # Expire File Pushes After XX Views
  #
  # Controls the "Expire After Views" form settings for File Pushes
  #
  # Environment variable overrides:
  # PWP__FILES__EXPIRE_AFTER_VIEWS_DEFAULT=5
  # PWP__FILES__EXPIRE_AFTER_VIEWS_MIN=1
  # PWP__FILES__EXPIRE_AFTER_VIEWS_MAX=100
  #
  expire_after_views_default: 5
  expire_after_views_min: 1
  expire_after_views_max: 100

  # Retrieval Step for File Pushes
  #
  # This enables or disables the "1-click retrieval step" feature entirely.  For the default value
  # when it is enabled here, see the next setting.
  #
  # Environment variable override:
  # PWP__FILES__ENABLE_RETRIEVAL_STEP='false'
  #
  enable_retrieval_step: true

  # Default Form Value for the Retrieval Step
  #
  # When the retrieval step is enabled (above), what is the default value on the form?
  #
  # When true, secret URLs will be generated as /f/xxxxxxxx/r which will show a page
  # requiring a click to view the page /f/xxxxxxxx
  #
  # Environment variable override:
  # PWP__FILES__RETRIEVAL_STEP_DEFAULT='true'
  #
  retrieval_step_default: false

  # Deletable File Pushes
  #
  # default: true
  #
  # This enables or disables the "Allow Immediate Deletion" feature entirely.  For the default value
  # when it is enabled here, see the next setting.
  #
  # Environment variable override:
  # PWP__FILES__ENABLE_DELETABLE_PUSHES='false'
  #
  enable_deletable_pushes: true

  # Deletable File Pushes Default Value
  #
  # default: true
  #
  # When this is set to true, this option does two things:
  #   1. Sets the default check state for the "Allow viewers to
  #       optionally delete password before expiration" checkbox
  #   2. JSON API: Sets the default value for newly pushed passwords if
  #       unspecified
  #
  # Environment variable override:
  # PWP__FILES__DELETABLE_PUSHES_DEFAULT='false'
  #
  deletable_pushes_default: true

  # Blur Payloads
  #
  # default: true
  #
  # This option does not affect the JSON API - web UI only.
  # When this is set to true, this option will display the pushed text payload as
  # blurred out text.  This is useful for recipients in public places who don't
  # want to reveal the sensitive information until when they choose.
  #
  # The blur is disabled with a single mouse click.
  #
  # Setting this option to false will disable the blur feature entirely for file pushes.
  #
  # Note: This is a global on/off switch currently.  This may be made configurable per push
  # in the future by adding a new checkbox and a `blur_default` setting.
  #
  # Environment variable override:
  # PWP__FILES__BLUR='false'
  #
  enable_blur: true

  # Maximum File Upload Count
  #
  # default: 10
  #
  # This option controls the maximum number of files that can be uploaded
  # in a single push.
  #
  # Environment variable override:
  # PWP__FILES__MAX_FILE_UPLOADS=10
  #
  max_file_uploads: 10

  # File Storage
  #
  # Password Pusher can store uploaded files into Amazon S3, Google Cloud Services
  # or Microsoft Azure.
  #
  # Choose your file storage preference by setting the following option to
  # one of the following values:
  #   * local     - use local disk (likely won't work in container environments)
  #   * amazon    - use Amazon S3 (and provide 's3' credentials below)
  #   * google    - use Google Cloud Storage (and provide 'gcs' credentials below)
  #   * microsoft - use Microsoft Azure Storage (and provide 'as' credentials below)
  #
  # Environment variable override:
  # PWP__FILES_STORAGE='local'
  #
  storage: 'local'

  # Amazon S3 Storage Credentials
  s3:
    # Environment Variable Override: PWP__FILES__S3__ENDPOINT=''
    endpoint: ''
    # Environment Variable Override: PWP__FILES__S3__ACCESS_KEY_ID=''
    access_key_id: '_'
    # Environment Variable Override: PWP__FILES__S3__SECRET_ACCESS_KEY=''
    secret_access_key: ''
    # Environment Variable Override: PWP__FILES__S3__REGION=''
    region: 'us-east-1'
    # Environment Variable Override: PWP__FILES__S3__BUCKET=''
    bucket: 'pwpush-files'

  # Google Cloud Storage Credentials
  gcs:
    # Environment Variable Override: PWP__FILES__GCS__PROJECT=''
    project: ''
    # Environment Variable Override: PWP__FILES__GCS__CREDENTIALS=''
    credentials: ''
    # Environment Variable Override: PWP__FILES__GCS__BUCKET=''
    bucket: ''
    #
    # Optionally use IAM instead of the credentials when signing URLs.
    # This is useful if you are authenticating your GKE applications with Workload Identity,
    # See here: https://edgeguides.rubyonrails.org/active_storage_overview.html#google-cloud-storage-service
    #
    # Environment Variable Override: PWP__FILES__GCS__IAM=true
    iam: false
    # Environment Variable Override: PWP__FILES__GCS__GSA_EMAIL='email@domain.com'
    gsa_email: null

  # Microsoft Azure Storage Credentials
  as:
    # Environment Variable Override: PWP__FILES__AS__STORAGE_ACCOUNT_NAME=''
    storage_account_name: ''
    # Environment Variable Override: PWP__FILES__AS__STORAGE_ACCESS_KEY=''
    storage_access_key: ''
    # Environment Variable Override: PWP__FILES__AS__CONTAINER=''
    container: ''


### Password Generator Defaults
#
# Set the defaults of the front page password generator.
#
gen:
  # Whether generated passwords have numbers
  #
  # Environment variable override:
  # PWP__GEN__HAS_NUMBERS='true'
  #
  has_numbers: true

  # Whether generated passwords will be title cased
  #
  # Environment variable override:
  # PWP__GEN__TITLE_CASED='true'
  #
  title_cased: true

  # Whether generated passwords will use separators between syllables
  #
  # Environment variable override:
  # PWP__GEN__USE_SEPARATORS='true'
  #
  use_separators: true

  # List of consonants to generate from
  #
  # Environment variable override:
  # PWP__GEN__CONSONANTS='bcdfghklmnprstvz'
  #
  consonants: 'bcdfghklmnprstvz'

  # List of vowels to generate from
  #
  # Environment variable override:
  # PWP__GEN__VOWELS='aeiouy'
  #
  vowels: 'aeiouy'

  # If `use_separators` is enabled above, the list of separators to use (randomly)
  #
  # Environment variable override:
  # PWP__GEN__SEPARATORS='-_='
  #
  separators: '-_='

  # The maximum length of each syllable that a generated password can have
  #
  # Environment variable override:
  # PWP__GEN__MAX_SYLLABLE_LENGTH=3
  #
  max_syllable_length: 3

  # The minimum length of each syllable that a generated password can have
  #
  # Environment variable override:
  # PWP__GEN__MIN_SYLLABLE_LENGTH=1
  #
  min_syllable_length: 1

  # The exact number of syllables that a generated password will have
  #
  # Environment variable override:
  # PWP__GEN__SYLLABLE_COUNT=3
  #
  syllables_count: 3

brand:
  ### Site Title
  #
  # Environment variable override: PWP__BRAND__TITLE='Acme Corp.'
  #
  title: 'CONFIDENTIAL'

  ### Site Tagline
  #
  # Environment variable override: PWP__BRAND__TAGLINE='Security First'
  #
  tagline: 'Envoi de mot de passe sécurisé.'

  ### Site Disclaimer
  #
  # Environment variable override: PWP__BRAND__DISCLAIMER='Use at own use risk.'
  # disclaimer: 'This is a dummy disclaimer and should not be considered legally binding or taken seriously in any way. The content provided here is for entertainment and illustrative purposes only. Any resemblance to actual disclaimers is purely coincidental. We do not endorse or encourage the use of this disclaimer for any real-world applications, and we strongly advise consulting a legal professional for creating legitimate and appropriate disclaimers for your specific needs. By reading this disclaimer, you agree not to hold us responsible for any confusion, amusement, or bewilderment it may cause. This disclaimer has no legal validity, and any attempt to rely on it for legal, financial, or any other serious matters is ill-advised. Please use disclaimers responsibly and in accordance with applicable laws and regulations.'

  ### Show Footer Menu Toggle
  #
  # Environment variable override: PWP__BRAND__SHOW_FOOTER_MENU='true'
  #
  show_footer_menu: false

  ### Site logo
  #
  # ..for both a light and dark theme
  #
  # You can also replace these relative paths with fully qualified HTTP links to
  # external resources such as Amazon S3 etc.
  # e.g. PWP__BRAND__DARK_LOGO='https://mys3bucket.amazonaws.com/a/some-image.png'
  #
  # Environment variable override: PWP__BRAND__LIGHT_LOGO='https://mys3bucket.amazonaws.com/a/lea+giuliana.png'
  # Environment variable override: PWP__BRAND__DARK_LOGO='https://mys3bucket.amazonaws.com/a/lea+giuliana.png'
  #
  # light_logo: 'logo-transparent-sm-bare.png'
  # dark_logo: 'logo-transparent-sm-dark-bare.png'

  ### Favicon & icon images for mobile.  When people on mobile (phones/tablets), bookmark
  # the site or it is shown in history, these icons are used.
  #
  # You can also replace these relative paths with fully qualified HTTP links to
  # external resources such as Amazon S3 etc.
  # e.g. PWP__BRAND__ICON_57x57='https://mys3bucket.amazonaws.com/a/some-image.png'
  #
  # Although you should set all of the following values, at a bare minimum, make sure
  # to set at least icon_57x57 and icon_96x96.  Without these two, things are guaranteed
  # to not work.
  #
  # You can use an icon generator such as:
  # https://www.favicongenerator.com
  # https://www.favicon-generator.org

  #
  # Environment variable override: PWP__BRAND__ICON_57x57='/path/to/image'
  # icon_57x57: 'apple-icon-57x57.png'
  # Environment variable override: PWP__BRAND__ICON_60x60='/path/to/image'
  # icon_60x60: 'apple-icon-60x60.png'
  # Environment variable override: PWP__BRAND__ICON_72x72='/path/to/image'
  # icon_72x72: 'apple-icon-72x72.png'
  # Environment variable override: PWP__BRAND__ICON_76x76='/path/to/image'
  # icon_76x76: 'apple-icon-76x76.png'
  # Environment variable override: PWP__BRAND__ICON_114x114='/path/to/image'
  # icon_114x114: 'apple-icon-114x114.png'
  # Environment variable override: PWP__BRAND__ICON_120x120='/path/to/image'
  # icon_120x120: 'apple-icon-120x120.png'
  # Environment variable override: PWP__BRAND__ICON_144x144='/path/to/image'
  # icon_144x144: 'apple-icon-144x144.png'
  # Environment variable override: PWP__BRAND__ICON_152x152='/path/to/image'
  # icon_152x152: 'apple-icon-152x152.png'
  # Environment variable override: PWP__BRAND__ICON_180x180='/path/to/image'
  # icon_180x180: 'apple-icon-180x180.png'
  # Environment variable override: PWP__BRAND__ICON_192x192='/path/to/image'
  # icon_192x192: 'android-icon-192x192.png'
  # Environment variable override: PWP__BRAND__ICON_32x32='/path/to/image'
  # icon_32x32: 'favicon-32x32.png'
  # Environment variable override: PWP__BRAND__ICON_96x96='/path/to/image'
  # icon_96x96: 'favicon-96x96.png'
  # Environment variable override: PWP__BRAND__ICON_16x16='/path/to/image'
  # icon_16x16: 'favicon-16x16.png'
  # Environment variable override: PWP__BRAND__ICON_144x144='/path/to/image'
  # ms_icon_144x144: 'ms-icon-144x144.png'

### Throttling
#
# Configure the application throttling limits.
#
# Throttling enforces a minimum time interval
# between subsequent HTTP requests from a particular client, as
# well as by defining a maximum number of allowed HTTP requests
# per a given time period (per second, minute, hourly, or daily).
#
# See https://github.com/dryruby/rack-throttle#throttling-strategies
# for a description of function.
#
throttling:
  # ..maximum number of allowed HTTP requests per day
  #
  # Default: 5000
  #
  # Environment Variable Override: PWP__THROTTLING__DAILY='5000'
  daily: 5000

  # ..maximum number of allowed HTTP requests per hour
  #
  # Default: 600
  #
  # Environment Variable Override: PWP__THROTTLING__HOURLY='600'
  hourly: 600

  # ..maximum number of allowed HTTP requests per minute
  #
  # Default: 60
  #
  # Environment Variable Override: PWP__THROTTLING__MINUTE='60'
  minute: 60

  # ..maximum number of allowed HTTP requests per second
  #
  # Default: 20
  #
  # Environment Variable Override: PWP__THROTTLING__SECOND='20'
  second: 20


### Mail Server Configuration
#
# When logins are enabled, an SMTP server is required to send emails to users
# for things such as forgot password, unlock account, confirm account etc.
# If `enable_logins` is set to true above, the following _are required_ to be
# filled out with valid values.
#
# These values are passed through to ActionMailer configuration.  The documentation
# for ActionMailer is at:
# https://guides.rubyonrails.org/action_mailer_basics.html#action-mailer-configuration
#
mail:
  # Email delivery errors will be shown in the application
  # Environment Variable Override: PWP__MAIL__RAISE_DELIVERY_ERRORS='false'
  raise_delivery_errors: false

  # Allows you to use a remote mail server. Just change it from its default "localhost" setting.
  # Environment Variable Override: PWP__MAIL__SMTP_ADDRESS='smtp.example.com'
  # smtp_address: smtp.example.com

  # If your mail server requires authentication, set the username in this setting.
  # Environment Variable Override: PWP__MAIL__SMTP_USER_NAME='apikey'
  # smtp_user_name: 'apikey'

  # If your mail server requires authentication, set the password in this setting.
  # Environment Variable Override: PWP__MAIL__SMTP_PASSWORD='something@&#$'
  # smtp_password: ''

  # If you need to specify a HELO domain, you can do it here.
  # Environment Variable Override: PWP__MAIL__SMTP_DOMAIN='xyz.dev'
  # smtp_domain: ''

  # Port of the SMTP server
  # Environment Variable Override: PWP__MAIL__SMTP_PORT='587'
  smtp_port: 587

  # If your mail server requires authentication, you need to specify the
  # authentication type here. This is a string and one of :plain (will send
  # the password in the clear), :login (will send password Base64 encoded)
  # or :cram_md5 (combines a Challenge/Response mechanism to exchange
  # information and a cryptographic Message Digest 5 algorithm to hash
  # important information)
  # Environment Variable Override: PWP__MAIL__SMTP_AUTHENTICATION='plain'
  smtp_authentication: 'plain'

  # Use STARTTLS when connecting to your SMTP server and fail if unsupported.
  # Environment Variable Override: PWP__MAIL__SMTP_STARTTLS='true'
  # smtp_starttls: false

  # Detects if STARTTLS is enabled in your SMTP server and starts to use it. Defaults to true.
  # Environment Variable Override: PWP__MAIL__SMTP_ENABLE_STARTTLS_AUTO='false'
  smtp_enable_starttls_auto: true

  # Number of seconds to wait while attempting to open a connection.
  # Environment Variable Override: PWP__MAIL__SMTP_OPEN_TIMEOUT='10'
  smtp_open_timeout: 10

  # Number of seconds to wait until timing-out a read(2) call.
  # Environment Variable Override: PWP__MAIL__SMTP_READ_TIMEOUT='10'
  smtp_read_timeout: 10

  # When using TLS, you can set how OpenSSL checks the certificate. This is
  # useful if you need to validate a self-signed and/or a wildcard certificate.
  # This can be one of the OpenSSL verify constants, :none or :peer
  # Environment Variable Override: PWP__MAIL__SMTP_OPENSSL_VERIFY_MODE='none'
  # smtp_openssl_verify_mode: 'peer'

  # Configure the e-mail address which will be shown as 'From' in emails
  # See config/initializers/devise.rb where this is used
  # Environment Variable Override: PWP__MAIL__MAILER_SENDER='"Password Pusher" <pglombardo@pwpush.com>'
  # mailer_sender: '"Password Pusher" <pglombardo@pwpush.com>'

### Feedback Form
feedback:
  # The email that will receive the information filled out by users in the
  # Feedback form.
  #
  # Environment Variable Override: PWP__FEEDBACK__EMAIL='my@email.com'
  email: 'feedback@pwpush.com'

### Docker Pre-compilation
#
# This is useful if you modified the assets (e.g. CSS, JS, images) to customize
# the theme etc...  Assets are precompiled before serving.
#
# If you set a custom theme, you will need to precompile the assets on container boot.
#
# Pre-compilation isn't supported in this yaml file.  It is only supported
# through the environment variable PWP_PRECOMPILE='true'.
#
# See the following for more information:
# https://github.com/pglombardo/PasswordPusher/blob/master/Configuration.md#how-to-precompile-css-assets
#
# Environment Variable: PWP_PRECOMPILE='false'

### Themes
#
# Password Pusher uses Bootswatch themes.  See https://bootswatch.com/
#
# The following are the available themes.  The default theme is 'default'.
#
#   'cerulean', 'cosmo', 'cyborg', 'darkly', 'flatly', 'journal', 'litera', 'lumen',
#   'lux', 'materia', 'minty', 'morph', 'pulse', 'quartz', 'sandstone', 'simplex',
#   'sketchy', 'slate', 'solar', 'spacelab', 'superhero', 'united', 'vapor', 'yeti', 'zephyr'
#
# To change the theme, set the `theme` value to the name of the theme you
# want to use.
#
# Environment Variable Override: PWP__THEME='default'
#
# Important Note: This setting can only be controlled by environment variable. (PWP__THEME)
#                 It cannot be set in this config file.
theme: 'default'

### Language & Internationalization
#
# List of supported languages indexed by language code.  This is used
# to build the in application language menu.
#
# To remove the availability of languages from the application entirely,
# comment out the language code(s) from the list below.
#
# <language code>: '<language name>'
language_codes:
  ca: 'Català'
  cs: 'Čeština'
  da: 'Dansk'
  de: 'Deutsch'
  en: 'English'
  es: 'Español'
  eu: 'Euskara'
  fi: 'Suomi'
  fr: 'Français'
  hi: 'हिन्दी'
  hu: 'Magyar'
  id: 'Indonesian'
  is: 'Íslenska'
  it: 'Italiano'
  ja: '日本語'
  ko: '한국어'
  lv: 'Latviski'
  nl: 'Nederlands'
  'no': 'Norsk' # _no_ keyword in Ruby evaluates to false :-(
  pl: 'Polski'
  pt-BR: 'Português'
  pt-PT: 'Português'
  ro: 'Română'
  ru: 'Русский'
  sr: 'Српски'
  sv: 'Svenska'
  th: 'ไทย'
  uk: 'Українська'
  ur: 'اردو'
  zh-CN: '中文'

# Used internally for the language selector model.
# This provides a conversion of language codes to
# country codes show the correct flag icons.
# See:
# https://github.com/lipis/flag-icons
# https://flagicons.lipis.dev
country_codes:
  ca: :es-ct
  cs: :cz
  da: :dk
  de: :de
  en: :us
  es: :es
  eu: :es-pv
  fi: :fi
  fr: :fr
  hi: :in
  hu: :hu
  id: :id
  is: :is
  it: :it
  ja: :jp
  ko: :kr
  lv: :lv
  nl: :nl
  'no': :no # _no_ keyword in Ruby evaluates to false :-(
  pl: :pl
  pt-BR: :br
  pt-PT: :pt
  ro: :ro
  ru: :ru
  sr: :rs
  sv: :se
  th: :th
  uk: :ua
  ur: :pk
  zh-CN: :cn


### Site Default Locale
#
# The default language for the application.  This must be one of the
# valid/supported language codes from the list above.
#
# Example: default_locale: :es
#
# Environment Variable Override: PWP__DEFAULT_LOCALE='es'
default_locale: :fr

# Configure the logging verbosity of the application.
#
# Valid values are: debug, info, warn, error, fatal
log_level: 'warn'

# In containers, it is usually desired to log to stdout
# instead of using log files (e.g. log/production.log).
#
log_to_stdout: false

### Run in Subfolder
#
# To run in a subfolder, specify the path to use.  For example, if `relative_root`
# is set too 'pwpush_root', then the application is hosted at https://<host>/pwpush_root/
# (and this is where you will find the front page of the application).
#
# Environment variable override: PWP__RELATIVE_ROOT='pwpush'
# relative_root: 'pwpush'
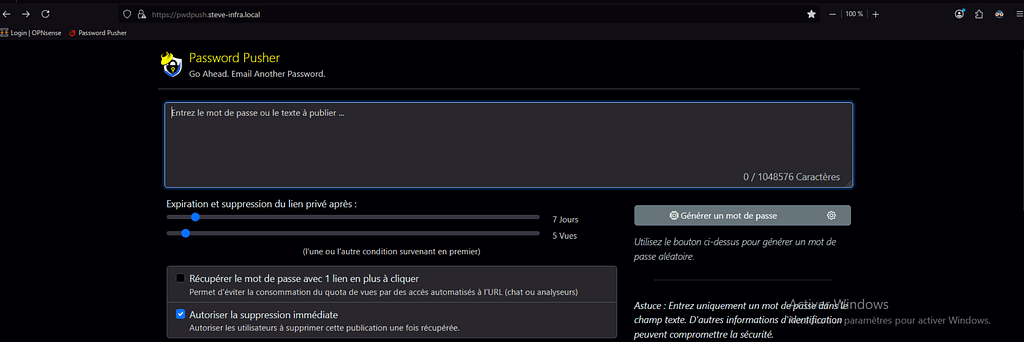
Voici le rendu final du Password Pusher personnalisé que j’ai mis en place :
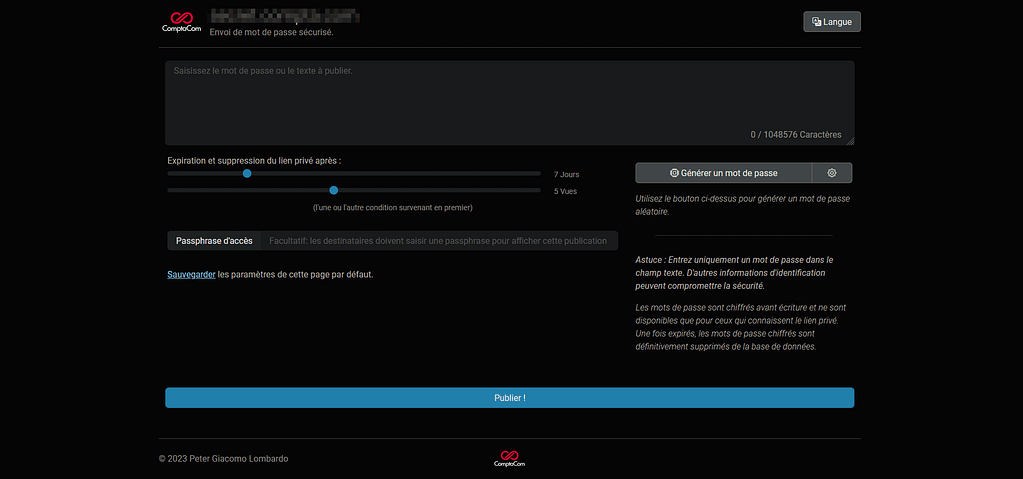
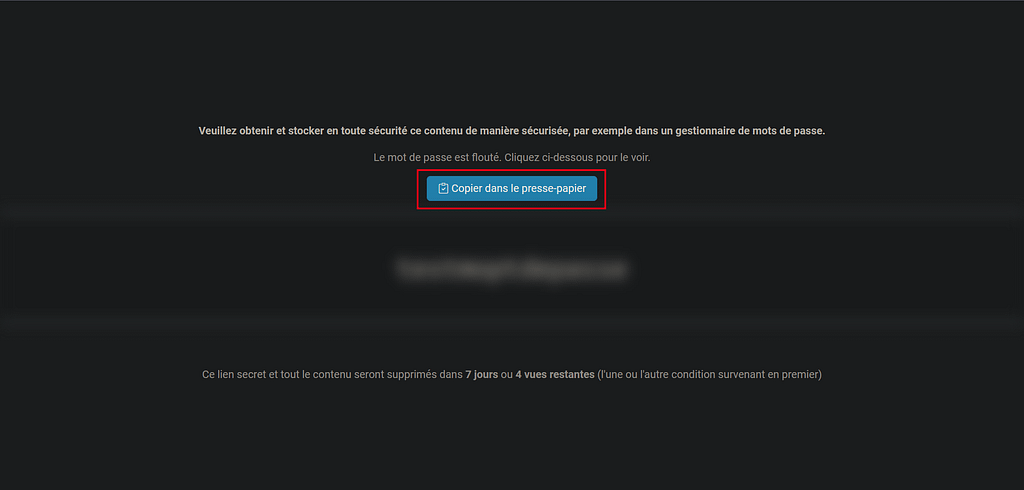
En cliquant sur publier, je peux générer un URL qui permettra à mon destinataire de recevoir le mot de passe en clair avec les règles prédéfinies dans Password Pusher tels que la durée de vie de l’URL et le nombre de fois où le destinataire pour visionner le mot de passe en clair.
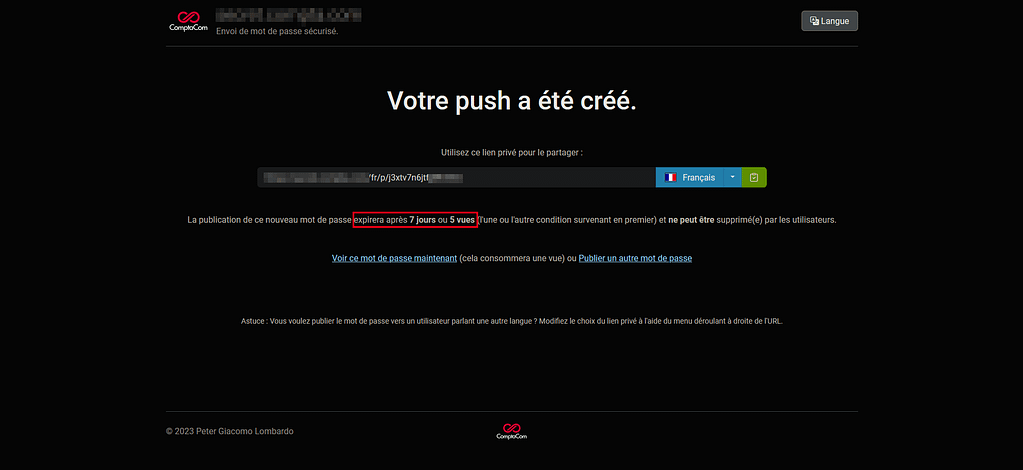
Le destinataire pourra grâce à l’URL visionner le mot de passe en clair en cliquant sur « Copier dans le presse-papier ».
Veuillez retrouver l’annexe 9 de cette réalisation ci dessous :

Laisser un commentaire